Monday, November 25, 2013

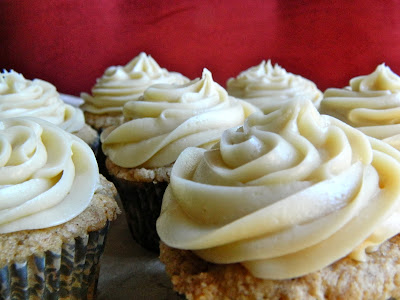
French Toast Cupcakes with Maple Cream Cheese Frosting

I made these a million days ago, but never got around to blogging about them.  With a 90% chance of rain all day and temperatures not getting higher than 40, I think I can make time to write about them.

These are another attempt to make a regular recipe into a GF-friendly recipe.  I took Bakingdom's recipe for French Toast Cupcakes and just substituted my Namaste GF flour blend for all flour in the recipe and voila! 


Spiced cake with cinnamon and nutmeg, a brown sugar streusel toppings, and maple cream cheese frosting.


I used maple extract for the frosting. Concentrated flavor without adding too much liquid to the frosting and thinning it.  


If you're not trying to make these GF, follow her recipe exactly. If you are trying to make them GF, I've found that measuring the flour by weight rather than cup for cup, makes the best conversion.  For instance, 1 cup=140g for GF mixes. So if the recipe calls for 3 cups of AP flour, weigh 420 grams of GF flour.  Make sense?


As I said above, instead of a maple buttercream, I did maple cream cheese frosting, because I love cream cheese frostings. 


Absolutely delicious and I'm pretty sure since "french toast" is in the name, these qualify as a breakfast option. Enjoy!


Head on over to Bakingdom for the cupcake recipe!  The maple cream cheese is listed below.

Maple Cream Cheese Frosting
1 package cream cheese, room temp
2 stick butter (salted or unsalted), room temp
6-8 cups powdered sugar
1 tbsp maple extract
1 tsp vanilla extract

Whip cream cheese and butter in mixer until smooth.  Begin to gradually add powdered sugar until desired consistency.  Add extracts and whip thoroughly.  Add more powdered sugar, if needed.

Wednesday, October 9, 2013

Spiced Chocolate Brownies

In sheer excitement over my new found gluten free baking journey, I think I may have overdone it on stocking.  As I said before, as soon as I accepted the challenge, I ordered about 20lbs of different types of flours from Vitacost.com.  When they were delivered to my door, the cardboard box was a little disheveled and when you opened it, all of my flours were in individually packaged "bricks" stacked together.  As I unloaded my flours, my husband joked that it looked like (what he would imagine to be) a drug shipment.  We still laugh about this "delivery."  About two days after, I found the Namaste GF flour blend at Costco which I ended up loving and buying 4 bags of.  At this point, you'd think my pantry would be well-stocked, if not overly-stocked.  Well, let's not stop there.  Over a month ago, I was visiting my sister in California and I decided to stock up on bags of almond meal from Trader Joe's.  At this point, Austin's new TJ store had yet to open, so I wanted to make sure I had almond meal a plenty to get me through to the opening.


Little known fact though, I'd never used almond meal before so I'm not entirely sure why I thought I needed so much of it.  In any case, I had opened one bag to get a feel for texture, etc, and after a month of being in the fridge decided I'd better use it.  Insert Foodgawker search for almond meal recipes here.


This recipe was to showcase a specific brand of molasses.  I did not use that brand, I used what I had.  It also said to bake pan brownie-style, but I liked the idea of individual bites.   


These brownie bites taste a little bit like a mixture between a cake-y brownie or dense cake.  Take your pick.  Then I dressed them up with a shot of cinnamon chocolate buttercream and they were delicious!


I kind of want to experiment with the spices a little more.  Maybe add cloves and nutmeg?  More gingerbread style?


I basically followed this recipe that I found on Foodgawker with a few changes you can see below. Enjoy!

Mini-Spiced Chocolate Brownies
1 cup almond meal
1 cup sugar
1/2 tsp ground ginger
1/2 tsp cinnamon
3 tbsp cocoa powder
4 tbsp flour (I used Namaste GF blend)
1/4 tsp baking powder
1/4 tsp salt
3 tbsp molasses
4 eggs

Preheat oven to 350 degrees. Line mini-muffin pan and fill liners 2/3 full.  Bake for 10 minutes. Allow to cool then frost.

Spiced Chocolate Buttercream
1 stick butter, softened
3 cups powdered sugar
1 tsp cinnamon
1 tsp vanilla extract
1-2 tbsp milk

Cream sugar and powdered sugar until smooth.  Add cinnamon and vanilla extract. Add 1 tbsp milk at a time and whip until desired consistency.

Saturday, September 7, 2013

Homemade Ice Cream Sandwiches

Gluten free baking: take one.

The hubs is a cookie fiend.  Love loves cookies (especially chocolate chip cookies), cookie monster style. Sadly since I've been cutting out gluten, his weekly cookie consumption has also taken a hit.  So I figured I should do right by him since he's been so wonderful about this diet change and work on perfecting his chocolate chip cookie.

While I'm anxiously awaiting my shipment of flours and new digital kitchen scale, I was shopping at Costco the other day and came across one of their new products, Namaste Perfect Flour Blend.  Each of the flours in this blend are ones that I ordered so I figured for $10, I should try their perfect blend (and ended up buying two bags in case it really was perfect).

First batch of cookies, I used a recipe I found online that called for coconut milk, a few different types of flours, and less eggs.  I followed the recipe exactly except for using the Namaste flour blend.  The blend is pretty dense, so I ended up cutting the amount of flour down.  When I get my kitchen scale, I'll actually measure out the flour by grams which should be a little more accurate.

Batch 1: Overcooked and crumbly.
Batch 2: (same dough) Cooked for less time, better right out of the oven, super crumbly the next day.


Day 2, I decided to "make" my own recipe based on what I had read for GF baking and going off of my favorite Tollhouse recipe.  Result: awesome.  You'd never know they were gluten free.  Even the dough was dare I say pretty much identical---even better after it was chilled for a few hours. To combat the "crumbly" day after cookie, I let them cool almost to room temperature then packaged them away and put them in the freezer.  The days following, we would grab a few and let them come to room temp microwave them for immediate enjoyment and they were perfect.

And to kick things up a notch, I made some this Salted Caramel Coconut Ice Cream on Labor Day to make sandwich cookies out of.  Also great to just scoop out onto warm, microwaved cookies---truth be told, that's what I had for breakfast after I worked out this morning.  That's okay, right?


Tips and Tricks for GF Baking I tried:
  • Bake at a temperature 25 degrees lower than regular recipe
  • Chill dough prior to scooping and baking
  • Use brown sugar for chewy cookie and more egg yolks
  • Beat butter and sugar longer than normal
  • Use room temperature ingredients

All in all, GF baking round 1 = success.

Gluten Free Chocolate Chip Cookies

2 cups Namaste Perfect Flour Blend
1 tsp baking soda
1 tsp salt
2 eggs + 1 egg yolk, room temperature
1 tbsp vanilla extract
1 cup butter, room temperature
1 cup brown sugar
1 1/2 cups chocolate chips

Preheat oven to 350 degrees. Whisk together flour, baking soda, and salt in separate bowl and set aside.  Beat butter until light and fluffy ( I used my paddle attachment).  Add brown sugar and continue to beat until well combined and fluffy.  Add eggs and vanilla and mix until combined.  Gradually add in flour mixture until well mixed. Fold in chocolate chips.

Chill dough for 1-2 hours.  Drop by spoonful onto parchment paper lined baking sheet.  Slightly press down tops of cookies.  Cook for 8-10 minutes. I cooked for 8 minutes then let the cookies rest on the baking sheet for 2 more before moving them to cooling rack.

Eat or freeze!

***I also made gluten free pizza crust with the Namaste Perfect Flour Blend and it turned out fabulous.  Nice and chewy and delicious!***


Thursday, August 29, 2013

Raw Fruit Tart (& MPPM goes GF)

Fair warning...this post is long and wordy, so feel free to skip to the bottom for the recipe if you're not interested in the update and I promise my feelings won't be hurt.  I'll add in pictures to break it up a little and here's one of what's to come. :)


It's been almost a year since my last post and while I'm sure no one really needs an explanation for my absence, I do want to explain which direction My Pretty Pink Mixer will be going.  Back in 2007, I was tested for Celiac Disease after becoming severely anemic and unable to absorb iron when taken orally.  While my antibody blood test was positive for Celiacs, my small intestinal biopsy did not show "enough" damage for my doctor to officially diagnose me with it.  However, he said it wouldn't hurt to try a gluten-free diet.  For me, it was difficult to stick with the diet knowing that it may or may not help, especially when I didn't have the immediate severe digestive symptoms most Celiacs had.  In order for me to see results, I needed to build back up my iron levels and that would take months---"trying the diet" wasn't good for me, I wanted a diagnosis to back it up.  After one blood transfusion and numerous iron infusions, I finally decided to give the gluten-free diet a shot.  I attempted to be gluten-free for almost year, but looking back now, I focused way too much on trying to replace familiar food staples with labeled "gluten-free" foods, such as bread, pasta, crackers, cookies, etc, and they just weren't that great.  Eventually, I felt remarkably better.  Though I wasn't sure whether to contribute that to the infusions, the diet, or both?  In the end, baking got the best of me and I decided to stop being gluten free.  Basically the next few years were a constant cycle of eat baked goods and bread, start to feel fatigued, cut them out and go gluten free for a while until I felt better, then add it back in.

Nothing to do with this post, but Nelly and I love hiking.
Fast forward to August of 2012, I had signed up to run the Houston Marathon in January of 2013.  This was my fourth marathon to run, fifth to train for (DNF one year when I tried to run with the flu, go figure).  I had been chasing a sub-4:00 and desperately wanted to do that in Houston, so I thoroughly evaluated everything I would need to do to get there.  First, I found a new training plan.  It had me logging way more miles than I had ever done before and incorporated track workouts, hill workouts, speed workouts (most of which I didn't end up doing).  Second,  I didn't tell anyone I was training. I told myself I would train and race as long as I was enjoying it and if at any point I wasn't, I could stop.  Took the pressure off.  Third, I canceled my gym membership.  I wanted to train solely outside.  I wanted to run in the heat, the rain, the cold, the humidity, the wind.  All conditions that would help me prepare for race day.  And fourth, I decided to go STRICTLY gluten-free.  I didn't focus on GF meal replacements, but tried to eat WHOLE foods---substituting zucchini for pasta in lasagna, lettuce-wrapping my burgers, and when I wanted a grain, I chose quinoa which is naturally GF.  Marathon training was four months, I started eliminating gluten about 6 months out to get it out of my system.  I shouldn't be surprised by the results, but I was.  I had way more energy, my training runs were better than they had ever been,  and I no longer had GI issues on runs (tmi).  In December, I caved and had a few cookies and cake every once in awhile, but now my body reacted to these things when I ate them---most often a stomach in turmoil.  

Ryan graduated from the Fire Academy in December.  And we celebrated my birthday AND two year anniversary.  So I ate cake...and cookies.
Now to the best part, bear with me. On January 14, 2013, race day,  I woke up in my hotel room in Houston with it pouring down rain and a nice warm 40 degrees.  Not ideal conditions, but refer back to point three, I had run in this weather before and I knew I could do it and I did.  I shaved off almost 17 minutes from my previous PR, completing the Houston Marathon with a 3:43.  I ran solo.  I ran with only my husband and my family knowing about it.  And I just ran.  I told myself not to look at my Garmin, to run comfortably, and to enjoy the race.  I never had an upset stomach, I never doubted myself, I never hit a wall, and I smiled the entire last mile to the finish line.  Looking back, I could have picked up my pace and challenged myself more, but that's not what I wanted it to be about.  I wanted to enjoy running again without pressure of beating a time (even though I desperately wanted to run sub-4:00, I didn't check my paces to make sure I was doing that).  Not by any means saying running 26.2 miles was a cake walk, my feet hurt like crazy and my legs were exhausted, but I never doubted I could finish.

Words can't describe how happy I was.
So long story short, whether or not I truly have Celiacs (though some doctors don't even do the biopsy anymore and rely solely on the blood test), I do know that gluten is no good for me and seen how my body reacts when I eliminate it.  Hence the reason, I haven't been baking.  I've tried my hand at making a few recipes gluten-free, but like an amateur, I subbed GF flour for AP flour 1:1 and that does not work out well, so I just didn't bake.  Well, not entirely true, I did bake these cakes for other people that I was proud of.

Cars themed smash cake.

Pirate themed first birthday!
But I miss it.  So I rid my kitchen of all the gluten-filled flour I kept handy "just in case", and I'm going to fill it with all sorts of flours that I really have no idea what I'm doing with but that won't make me feel terrible.  I've been doing my research and learning how to mix said flours, which ones work best for which baked goods, etc. and my goal is to make GF goods that rival my gluten-filled baked goods and that anyone would enjoy eating.  Also, at the request of my lovely coworkers,  I'll be posting some dinner ideas, as well, even though they don't require my mixer.  

I hope you'll continue to follow me even though I may not be posting regular gluten-filled goodies.  My intention is to de-glutenize many of my current recipes, so I'll probably post a GF version and the non-GF version.  

For my first post, I'm making this easy.  No flour whatsoever and happens to be Paleo compliant if that's your style.  This idea came from the Engine 2 Diet, I just spruced it up.

I used my brand new food processor, which happens to be my new best friend. How did I not own one of these before?? This, my friends, is a "chocolate-chip cookie dough" crust, layered with sliced fresh strawberries, strawberry puree, blueberries, and raspberries, then topped with homemade coconut whipped cream and toasted unsweetened coconut flakes sprinkled with cinnamon and sea salt.  So good. And so good for you.


Even my gluten-loving husband devoured this.


Did not intend for it to be red, white, and blue, I just like berries.  A lot.  Choose whatever toppings you like---oranges, cherries, bananas?


Hope you enjoy and welcome back.

Raw Fruit Tart
(printable recipe)

For the crust:
1 cup unsalted, raw almonds
24 dates (the ones I used are slightly smaller than medjool dates, they were from Costco)
1 tsp Vanilla extract
2 tsp unsweetened cocoa powder
dash of sea salt

Layers:
1 lb strawberries, save 5-6 to puree and slice the rest
1 pint blueberries
1 pint raspberries

Toppings/Garnish:
1 can full fat coconut milk, chilled 4-6 hours in refrigerator so the cream separates from the water
1 cup unsweetened coconut flakes
1/4 tsp salt
1 tsp cinnamon

Blend ingredients for crust together in food processor until finely chopped, about 3-5 minutes.  Press evenly into bottom of pie plate and place in fridge to chill.

You can follow instructions here for the coconut flakes or wing it.  I mixed together cinnamon and salt (no measurements) then placed some coconut in a large skillet over medium heat.  Watch it like a hawk because it browns quickly.  Continue to stir as it browns then immediately remove from heat when 2/3 of the pieces are lightly browned.  Immediately toss with salt and cinnamon then transfer to baking sheet to cool.

Clean fruit and let dry.  Slice strawberries, leaving 5-6 to puree with blender or food processor.  

Grab crust out of fridge and line bottom with sliced strawberries.  Pour pureed strawberries over the sliced and spread evenly.  Line raspberries around edge and place blueberries in the center.  

After the coconut milk has chilled thoroughly, carefully remove it from fridge (do not shake!) and open it.  Scrape the cream off of the top until you reach the water at the bottom.  Try not to collect too much of the water.  I whipped the coconut cream in a chilled metal bowl with chilled metal whisk (pink mixer style), but not necessary.  Whip coconut cream 5-6 minutes or until desired thickness.  Dollop on fruit tart and sprinkle with coconut flakes.  Serve immediately or cover and keep in refrigerator.