Tuesday, September 7, 2010

Rainy Day Bread

When the weather outside looks dreary,

And you have these items sitting in your fridge:


It only seems practical to make this:


That, my friends, is Pumpkin Banana Chocolate Chip Bread. And here's how you make it. First, you need the following ingredients:


Then, you mix the wet ingredients together (in your pretty pink mixer, of course)


Now mix the dry in a separate bowl:


And add them to the wet.  Be sure to mix only until combined:


Should look something like this:


Now pour it into a greased 9x5 pan and suddenly remember that you forgot to add the oil to the wet ingredients. Well, don't follow these instructions exactly...maybe follow the recipe. But yes, I completely forgot to add the oil.  I seriously contemplated pouring the mixture back into the bowl and adding the oil....but then I decided to just skip it. I've made plenty of recipes substituting apple sauce or pumkin puree for oil, so we'll see how it turns out.

End result:

Moist and delicious pumkin/banana/chocolate chip bread. (Actually the recipe I followed did not call for chocolate chips, I just added them for good measure.)


Who needs oil? Not this recipe.

Pumpkin Banana Chocolate Chip Bread
adapted from Allrecipes.com

2 ripe bananas
1 1/3 cup pumpkin puree
2 eggs
1/3 cup vegetable oil (optional)
1/2 cup honey
1/2 cup sugar
2 1/2 cups all purpose flour
1 tsp baking soda
1 tsp baking powder
1/2 tsp salt
2 tsp pumpkin pie spice
1 tsp cinnamon
3/4 cup chocolate chips (optional)

Mix wet ingredients with dry ingredients until just combined. Pour into greased 9x5. Bake at 350 for 45-55 minutes or until toothpick comes out clean. Cool and enjoy!


Saturday, July 24, 2010

Cupcakes for Mere

My little sister's 10th birthday was this week and in order to celebrate a very special birthday (double digits now!), I decided to make some very special cupcakes.


Meet Meredith! She is a bundle full of energy and precious.  Last week, she showed me some cupcakes that she liked and wanted for her birthday, so of course, I wanted to make them.  Unfortunately, I wasn't able to celebrate with her on her actual birthday, so I took these cupcakes over a few days later---just kept the celebration going!


I used a recipe that I found on Monica's blog at Lick the Bowl Good.  Her recipes never fail me.


Then I added colors that reminded me of Meredith. Bright blue, neon green, hot pink, and purple, the color of Meredith's bedroom.

Added a vanilla cream cheese frosting (which I wish could have been a little whiter, but it tasted good) and voila'!


Cupcakes for Mere :)

But they needed one more thing....


Sprinkles, obviously.

                    
These cupcakes are so vibrant and fun. I was anxious to see how the actual cake part tasted since usually box mixes are a go to sort of thing, but I was pleasantly surprised with this cake.  I didn't have the vanilla bean that the recipe uses as an option, so I added a little extra vanilla, but I think that vanilla bean would have made the vanilla "pop" a little more.


So cute.

Double Vanilla Cupcakes (from Amy Sedaris)

1 1/2 sticks (12 tbsp) unsalted butter, room temperature
1 3/4 cups sugar
2 large eggs
2 tsp vanilla
1/2 vanilla bean, scraped (optional)
1/2 tsp salt
2 1/2 tsp of baking powder
2 1/2 cups flour
1 1/4 cups milk

In a medium bowl, mix together salt, baking powder, and flour. Stir to combine then set aside. 

Cream butter and sugar together in a large bowl, then add in eggs, one at a time. Add vanilla extract and the seeds of half of a vanilla bean. Beat until well combined.  Alternately add the dry ingredients and the milk to the butter/sugar mixture. Start with flour, end with flour.

Divide batter into separate bowls (however many colors you like) and add dye to desired color. Layer in cupcake liners. (I put mine in plastic bags and snipped the ends)

Bake at 375 degrees for 18-20 minutes.

Vanilla Bean Frosting

2 sticks butter, room temperature (1 cup)
1 package cream cheese (8 ounces)
2 tsp vanilla extract
1/2 vanilla bean, seeds scraped out
4-5 cups powdered sugar 

Using an electric mixer, beat the butter at medium speed until creamy. Add the cream cheese and beat until combined.  Then add the vanilla extract, vanilla seeds, and 3 cups of powdered sugar and beat a low speed, occasionally stopping to scrape the sides and bottom of the bowl, until light and fluffy. Add more powdered sugar to arrive at the consistency and sweetness you like. Frost cupcakes.


Wednesday, July 7, 2010

Cupcake Kick

So I've officially decided I'm on a cupcake kick....or there just happened to be two birthdays within a week's span of eachother and rather than make a whole cake, I chose cupcakes. Regardless, July 4th was my good friend Kendra's 25th birthday. Kendra and I have known eachother since 1st grade (crazy, I know) and grew up great friends. When we were younger, she would spend every birthday with my family out at the lakehouse, it sort of became a tradition, but as we got older, birthday at the lake became a thing of the past and we both went off to different schools and only recently became reunited!

Moving on.  Same as last week, I did my research (aka text said friend) and asked what her favorite kind of cake was.  Yellow cake with chocolate frosting. Okay then. Easy enough, right? Wrong.

Little did I know, yellow cake is actually a baker's dilemna.  The more and more I searched for the perfect recipe, the more and more I read about homemade yellow cakes coming out dry and "not as good as the box." Well, I was determined not to use a box mix and googled and googled homemade cake recipes with good reviews.

I finally found one from the Smitten Kitchen that she called the "Best Birthday Cake Ever." Her post about the cake seemed confident and I was sure it had to be better than a box.


When it came time to bake my cake, I had already gone to the grocery store for needed ingredients, set them all out on the counter, got out my measuring cups and went to work.  First ingredient, cake flour. Drat! I didn't have cake flour, I had "all-purpose" flour.  Would they work the same? I wasn't sure. And didn't really want to google it and find that it did indeed make a difference. So I went with it.

The batter was delicious but.......very thick. Is that a flour difference? Probably. Oh well, I scooped my batter into cupcake liners and baked.  Smelled good, looked good. Have you noticed that homemade yellow cake is not nearly as yellow as box cake? I choose to believe that box cakes probably add yellow #50 and my batter didn't have dye in it. 

Initial cake test: tasty but a little dry. Boo. Maybe icing would fix it?

I also searched for a good chocolate buttercream icing that was relatively simple.  Nothing that sparked my interested so I used my great-grandmother's no fail chocolate frosting recipe.

Chocolate Frosting

1 stick butter (room temperature)
4 cups powdered sugar
3 heaping tbsp cocoa powder
2 tsp vanilla
4 tsp milk

Mix butter, sugar, and cocoa. Add vanilla and milk. Blend till smooth.

Icing=yum.

Icing on top of cupcake=semi-yum.  Still wasn't pleased with the cake texture. Not that it stopped me from eating them.


All topped off with some colorful sprinkles!

Now you may wonder why I didn't do some sort of red, white, and blue theme, since her birthday is Fourth of July afterall. That's so overdone. I kept my cucpcakes simple but cute.

Still on the lookout for a good yellow cake recipe...or maybe I'll just follow the instructions next time and use cake flour.

Monday, June 28, 2010

Delish.

I'm sorry for the lack of posts lately. No excuses. But I'm glad I've made a comeback with these cupcakes, because there is only one word for them. Delish.


One of my friend's birthdays was this past week and for her present, I knew I wanted to bake her something. Obviously.  So I did a little research (aka I texted her) and asked her what her favorite cake flavors were. 

Response: Strawberry cake, carrot cake, pretty much any cake.

My thoughts: 
Strawberry cake: I could make the same strawberry cake I made for Nelly's birthday, but I wanted to make cupcakes and wasn't sure how they would turn out in that form
Carrot cake: don't really have a good carrot cake recipe but I'm sure I could come up with something
Pretty much any cake: too many options. I was overwhelmed.


So I went to my handy-dandy, trust, ginormous pink binder of recipes....and found....

Steven's Carrot Cake.

My brother-in-law, Steven, has a recipe for carrot cake that he got from his mom and he made for my sister the first year they dated for her birthday.  It was so moist and yummy so I, of course, asked for the recipe.  Imagine how surprised I was when I read the secret ingredient.  Baby food carrots. That's right folks. Two jr. size jars of pureed baby food carrots.  Putting aside my initial disgust, I realized the only thing in baby food carrots is pureed carrots. Go figure. Maybe they're not that bad.  Not saying I would eat jars with a spoon or anything, but I suppose they can go in my cake.  Just like applesauce, right? Right.

The batter came together so easily and although the recipe is for a 9x13 in. sheet cake, I turned them into cupcakes.


Now cream cheese frosting is my absolute favorite, but sometimes it's tricky to get the right consistency and flavor, so I googled a bunch of different recipes, visited my go-to blogs, and came up with what I consider the "perfect blend."

You all know how addicted I am to cinnamon.  Well, it only seemed appropriate to pair it with cream cheese icing and carrot cake.  Therefore, I give you...cinnamon cream cheese frosting. Um, yes please.

I could eat this by the spoonful (and believe me, I did). 
My only disappointment with these cupcakes was that I forgot to borrow my mom's icing decorating tips and kit so I was forced to use a ziploc bag with a cut corner for my decorating purposes. Next time.


Moist cake. Delicious icing. I'm ready to start my bakery with these bad boys. 

Now I just need to work on my decorating skills.  All in time, my friends. All in time.


Saturday, May 15, 2010

Sweet Potato Cinnamon Rolls

Do not be fooled by the title.  Yes, these cinnamon rolls have sweet potato in them. No, these cinnamon rolls are not healthy. Slightly more nutritious with the sweet potato and whole wheat flour that I added, but in no way less caloric or sugary.  Regardless, they are wonderful.

I have this recipe that I pulled out of the January 2007 Southern Living magazine that was the "Grand Prize Winner."  Grand Prize Winner of what, I'm not sure. I would initially have said "Grand Prize Winner of Cinnamon Rolls" but on the back of this page is a "Finalist recipe" for Mexi-Texi Bistec Pedazos.  That has nothing to do with cinnamon rolls.

I'm pretty sure when I first made these cinnamon rolls, I made them over and over again for a good couple of months. Then I got sick of them and retired the recipe.  I remembered them being very, very sweet, but very, very good.  Today, Nelly wasn't feeling so hot so I decided to spend the day at home...baking.  I had sweet potatoes already and every other ingredient.  Fabulous.

These rolls do take some patience, but time was all I had today.  The dough came together easily and it rose perfectly.

Now if only I had taken pictures of the rolling out and rolling up and slicing.  And the "before going into the oven" picture.  I'm learning.

The filling was easy....brown sugar, cinnamon, nuts and butter.
The recipe uses a food processor to make them, I used my pink mixer.

And now, the finished product.
Mmm...I remembered them needing more time in the oven than the recipe calls for so I baked them an extra 5 minutes....I may have overbrowned them. :)
Delicious, none the less.
Yum. See the caramel sauce on the bottom of the plate? Yes, please.
I did make a few changes to the recipe myself.  Instead of all white flour, I used half whole wheat flour.  I also made my own buttermilk with vinegar and milk.  The texture with the whole wheat flour is a little more "grainy", if you will, but is still really nice and you can see specs of sweet potato.

I found the recipe online for Sweet Potato Cinnamon Rolls for everyone to try, that way I don't have to type it all out.  Hope you'll try it and enjoy.

Wednesday, May 12, 2010

"Hoppin'" Mother's Day

Mom's are special and so I obviously wanted to make something special for my mom this Mother's Day.  You wouldn't believe the thought that I put into choosing a dessert for my mom.  I brainstormed her favorite flavors, thought about what I had made her in the past, thumbed through cookbooks, picked a recipe, changed my mind, picked another recipe, made a grocery list, picked a different recipe, scratched out the grocery list, made new one, then right before going to the store for ingredients, found the perfect recipe...and made a new grocery list.

Originally, I had decided to try to make a Sweet Lemon Tart for her from Dorie Greenspan's Baking cookbook.  It was relatively simple, used whole lemons, and the filling sounded tart and refreshing with an almond crust.  I had already gone to Williams-Sonoma to pick up a 9-inch tart pan...and microplane zester, just because, before I changed my mind on the tart. Still unsure, I pulled out my Pastry Queen cookbook by Rebecca Rather and looked through that. 
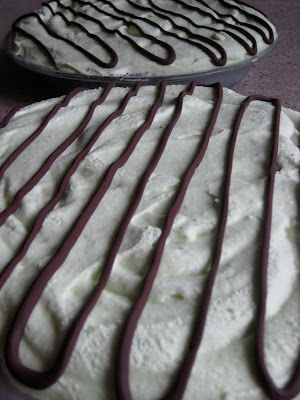
And there it was. Grasshopper Pie. Oreo cookie crumb crust with Creme de Menthe filling topped with hot fudge. Pefect. My mother's favorite girl scout cookie is Thin Mints and she loves York Peppermint patties.  Mint+Chocolate=happy mom. At first glance, the recipe seemed simple enough, little did I realize, it would actually be very, very time-consuming, but totally worth it.
I didn't have any of the ingredients it called for, except for butter (yay), so a trip to the grocery store was in order.  Only thing I forgot to pick up was a candy thermometer, but it worked out okay.  My local grocery store didn't have "Creme de Menthe" so I substituted Pure Mint Extract and added a little green food coloring.
You start by whipping the egg yolks with one whole egg. While those are whipping, you make a simple syrup with sugar and water and simmer it until it reaches a soft ball boil stage.  This is where a candy thermometer would have come in handy.  However, I've made caramel many times and just used the ice water method that I use for caramel and when the syrup rolls into a soft ball in the ice water, it's done. Voila!
Now, you carefully stream the simple syrup into the whipped eggs. Complicated much? Now add marshmallow fluff and mint and gelatin. And now, beat heavy whipping cream until it makes soft peaks and fold into mint mixture. Whew. Then the easiest step...put it into the crust and into the freezer.

All of these steps were totally worth the outcome.  The pie was creamy and delicious. The only change I would make, would be to either use a deeper pie crust or just make less crust. The crust was kind of thick and when it was frozen, very hard to cut with a knife and your fork.

I drizzled melted chocolate chips on top of mine for decoration then a dollop of hot fudge when serving. I made two pies. One for my mom and one for my boyfriend's mom.  Each mom equally enjoyed their pie.

The recipe is pretty long, but I found it online on google books, so you can try Grasshopper Pie yourself. Enjoy and I hope everyone had a very Happy Mother's Day!

Thursday, May 6, 2010

30 Day Challenge Success

At long last, my 30 day challenge is OVER.  Whew! I am so excited to start baking again and try some of the recipes I've been bookmarking for the past month.  For my first recipe back in the baking world, I chose something super simple and that would use up the rest of my dulce de leche from my oatmeal cookies.  A friend from work brought in these oatmeal, chocolate, caramel bars a long time ago and I printed off the recipe but had yet to make them. Instead of using caramel like the recipe said, I used my dulce de leche.  Pretty similar, right?

Not going to lie. These guys are pretty sweet and very rich.  Might have something to do with all the butter.  Maybe.

Absolutely delicious! At least they have oatmeal in them. They've got something healthy going for them. :)
I added a few things to the recipe myself. For instance, using dulce de leche instead of caramel.  I also added vanilla and cinnamon. Perfect additions, I think.

Oatmeal Caramel Bars
Adapted from recipetips.com


1 1/2 c butter melted
2 c flour
1 tsp baking soda
2 c oatmeal
1 1/2 c brown sugar
1/2 tsp salt
8 ounces chocolate chips
1 c caramel ice cream topping (or dulce de leche)
4 tbsp flour
1 tbsp vanilla
1 tsp cinnamon

Preheat oven to 350 degrees. Grease 13x9 pan.
In a medium bowl, combine butter, flour, baking soda, oatmeal, brown sugar, and salt.  Stir to combine. Press half of the mixture into the bottom of the prepared pan.
Bake for 10 minutes. Cool slightly.
Combine caramel topping (or dulce de leche) and tbsp flour. Sprinkle chocolate chips over crust. Drizzle caramel topping over chocolate chips and crust. Crumble remaining oatmeal mixture over the top of the caramel.
Bake for 15 minutes. Let bars cool before cutting.

I have a couple of things planned for Mother's Day so be sure to check back.  Also be sure to check out my other blog Food for Fuel.

Banana Nuts

Once again, I am being a bad blogger.  It's taken me entirely too long to put up another recipe and post.  I honestly can't wait for my 30 day challenge to be over, because then I can go back to making sweets! May 4, let's go. Bread is too boring for me and while I could experiment with other things obviously, like scones or muffins, I just feel like those might go to waste.  I'm pretty set on my oatmeal for breakfast, so I don't know where I would fit in scones and muffins, etc. :)  In any case, I did make some banana bread this weekend with 4 overly ripe bananas I had sitting around along with some stolen borrowed nuts from my mother.

This recipe for banana bread was given to me by my mother. I'm not entirely sure what cookbook it came from...Fannie Farmer, maybe? But it's delicious. Unfortunately, I may have overcooked it in the oven, but it still tasted pretty good.  Note to self: bake less next time.

Banana Nut Bread

2 c flour
1/2 tsp baking powder
1/2 tsp baking soda
1/4 tsp salt
3/4 c sugar
1/4 c butter
1 tsp cinnamon
1 egg (lightly beaten)
2/3 c mashed bananas (2 medium)
1/2 c chopped pecans
3 tbsp buttermilk or plain yogurt

Preheat oven to 350 degrees. Sift flour before measuring. Resift with baking powder, soda, and salt and set aside. 
In another bowl, cream butter and sugar.  Add in egg, bananas, and pecans.  Add flour mixture in thirds, alternating with buttermilk.  Mix only until blended.  Pour into well-greased 8x4 loaf pan. Bake for 1 hour.

I took pictures of the finished product but not of a slice of it so you could see the texture and inside. Fail. Just trust me and make it. You will like it.


I also experimented with making my own Almond Butter.  I had to borrow a food processor from my mother in order to make this and it's kind of an old food processor, so maybe the almond butter would have turned out differently with a brand new high powered one, I don't know.

I got the recipe from Edible Perspective for the Maple Cinnamon Almond Butter. Her's looks fantastic and creamy. Mine was delicious but not as creamy and it took forrrrrrrever. The food processor also made a lot of noise so I was very self-conscious about running it in my apartment.

Next up, I want to try making my own coconut butter. But I may have to invest in a food processor of my own before doing that. :)

Friday, April 16, 2010

Holla!

I am so sorry, I feel like I have been neglecting my pretty pink mixer.  Here's the scoop...my boyfriend and I decided to do a 30-day challenge of no desserts and no alcohol for 30 days (obviously).  I felt like I had been making entirely too many sweets lately so it was just kind of a spur of the moment, let's break the habit type of thing (and stop adding on the pounds).  As you can tell from the blog, the majority of things I make are desserts...bars and cookies, basically. So in the meantime, I started another blog, which I hope you will check out, called Food for Fuel.  Basically, it's days in the life of me. I take pictures of meals, talk about my exercising, life, all that good stuff.  I read blogs all the time---both baking and food blogs and health blogs and this blog is more along the lines of a "healthy" blog.  Still love my sweets and dessert, but I also love eating healthy and wanted to share that with everyone.

So because I couldn't make desserts and enjoy them, I was taking a break from my pretty pink mixer.  However, my red-headed friend, Ellie, was in town the past few weeks and we made a bunch of Challah!  Yummy, yummy traditional Jewish bread that we make not so traditional by adding all sorts of different flavorings to. Like rosemary-garlic, whole wheat, cinnamon-chip, chocolate chip, etc.  I LOVE making sandwiches out of just plain challah. My favorite is a grilled cheese sandwich on challah with pickles and spicy mustard. Delish!  Unfortunately, I never took pictures of all the challah we made, so I decided to make some by myself today.


Ellie started the organization Challah for Hunger that now has chapters at multiple university locations in the U.S. AND Australia. Be sure to check out her page and efforts. In any case, the recipe I made for Challah is hers that she uses for all of her chapters.  It's by far the BEST challah recipe ever.  At least, I think so. 


It's pretty easy to make, especially her new and improved method of using instant active yeast.  Just takes time to rise.  Another thing about this Challah is that it's completely vegan, as Ellie is herself.  


Here's the problem I ran into. For the life of me, I can never remember how to braid the challah. So I did a "makeshift" braid and stuck it in a loaf pan because I wanted to slice it for sandwiches anyways.  


The other half of the dough I got creative with. I wanted to do a cinnamon breakfast type bread like the cinnamon chip bread from Great Harvest Bread Co.  So, I made balls of dough (golf ball size) and stuffed them with cinnamon chips, then put them in a round aluminum cake and sprinkled the top with cinnamon. We'll see how it turns out. And since I'm calling it a breakfast bread and would probably eat it for breakfast, I'm not considering it a dessert. :)


Things I would change....maybe dust cinnamon sugar around the pan or roll the dough in cinnamon sugar rather than just sprinkle on top. I guess it depends on how sweet you want it.


Unfortunately, I cannot give out the recipe to just anyone but if you feel inspired and would like to e-mail Ellie for the recipe, visit her website at challahforhunger.org. :)


Until next time!

Wednesday, April 7, 2010

Rolls for every occasion

For every big holiday (Easter, Thanksgiving, Christmas), my mom and I make our traditional whole wheat rolls.  These rolls are slightly deceiving because they sound super healthy (whole wheat) when in reality they only contain 1 cup whole wheat flour to 3 cups white flour.  We've played with the recipe by adding a higher ratio of wheat to white flour, but they just don't taste as good as the originals. Whatever name you want to give them, these rolls are absolutely amazing!  They are shaped like crescent rolls but not necessarily the texture and flakiness of a tubed crescent roll.  They are buttery and slightly sweet and ADDICTING.  For each holiday we have to double triple the recipe so we make enough rolls for the holiday lunch/dinner, and enough for us to snack on until said lunch/dinner. 
Warning: these rolls are very time consuming!  First you make the dough, then let them rise for 1 1/2-2 hours, then roll them out and shape them, then let rise another hour, then bake.  So expect to spend the entire day with these little guys.

I neglected to take pictures of all the steps to making these, which I really should have, so my apologies.  Next time I'll be more on top of it! Here is a picture of the rolls rising the second time around and the finished product. I wasn't able to get pictures of all of the best rolls because once I was taking pictures, my siblings had already eaten all of the really good looking ones. Oh well. You get the idea.

Here's the recipe and I highly recommend you try these. I actually already doubled the recipe for the one I have written down, so if you don't want lots of rolls, cut this recipe in half:

Whole Wheat Rolls


1 c butter
1 c milk
4 eggs
3/4 c warm water
6 c white flour
2 c whole wheat flour
1 1/2 tsp salt
3/4 c sugar
4 1/2 tsp or 2 pkgs yeast
Softened butter to spread on rolls before they rise 2nd time

Preheat oven to 350 degrees. Mix warm water and yeast to proof.
Melt butter and let cool. Beat in eggs. Add milk and set aside.
Combine flours, salt, and sugar.
Pour in liquids and knead until smooth. (I would use the dough hook on the Kitchenaid mixer to mix ingredients, then knead until shiny...but that's just me :) )
Set in greased bowl (I use PAM) and allow to rise until double (1 1/1 hours)
Divide dough into three parts and roll out in large circle.  Thin but not too thin or too thick. Spread softened butter onto entire circle of dough. Cut into wedges with a pizza cutter (like making a pie chart) and roll up like crescent rolls. Place on grease baking sheets.
Allow to double 1 more hour.
Bake at 350 until light brown. (10-12 minutes)

I really wish I had taken pictures of these steps because now that I'm re-reading over the recipe, it's kind of confusing. Let me know if you have any questions! This is a picture of them rising the second time.

We made these rolls on Friday before Easter and just kept them in an airtight container until we served them. Reheated them in the oven and they were just as good as the first day. They are yummy by themselves, with butter, with nutella (my favorite), with PB, with anything! Rolls are not very photogenic.
On Easter we served them with a nice honey glazed ham, fresh carrots and green beans, cheesy scalloped potatoes, and deviled eggs.
And for DESSERT......Easter M&M brown sugar blondies. I love these things! Yum, yum!
And just because I love my siblings. Here is a picture of my little brother and sister digging in.
And look at these bluebonnets in my mom's front yard! Hope everyone had a wonderful Easter and fabulous Sunday!